How to use SmartFTP v1.0-Full version
This program can be downloaded from http://www.smartftp.com This is the latest version and can be downloaded free for personal, educational and non-profit organization use, but you will be reminded eventually to register. You do not have to register if you prefer unless you are a commercial user, but you will not receive support. The tutorial is quite long as it contains detailed screenshots showing you how to connect and upload your files to your server.1) Starting SmartFTP
Once downloaded and installed open SmartFTP by going to Start->Programs->SmartFTP as shown in screenshot:-

You can put a shortcut on your desktop.
2)Settings
If you don't see the settings dialog at startup go to Menu->Tools->Settings A box will come up like this :-

3) E-Mail Address:
This will be used as the default password for anonymous login. You can enter any email address in there, (it does not have to be any of yours, just think up one) e.g.mail@host.com
4)Default Download Path:
This will be your default download location. e.g.C:\Downloads or whatever folder you use to download to.
5)Text File Viewer:
Change this if you want to use another text editor to open your text files etc.
6)Data File Path:
The location where all the data files (favorites,queue etc.) are stored (I left the default setting for this)
7) Click OK to save.
8) You are now ready to Connect to do this you need to go through the following steps:-

Address Enter your hostname e.g.server.com or www.mysite.com or the full URL e.g.ftp://user:pw@server.com:port/path (I used the www.mysite.co.uk option)
Login Enter user name (unless you've entered the full URL in the "Address" field)
Password Enter your Password (unless you've entered the full URL in the "Address" field)
Please Note If you don't know your server and account information (Host,Login,Password) you can get this information from your hosting provider or the server administrator.
9)To Connect
Press the "Connect" icon on the toolbar as shown below:-

OR Go to Menu->FTP->Connect OR - Hit Control + B
A new "Remote Window" opens up and SmartFTP begins to connect to the server. You will notice the connecting progress in the "Log View" at the bottom of the window. This is what it will look like:-

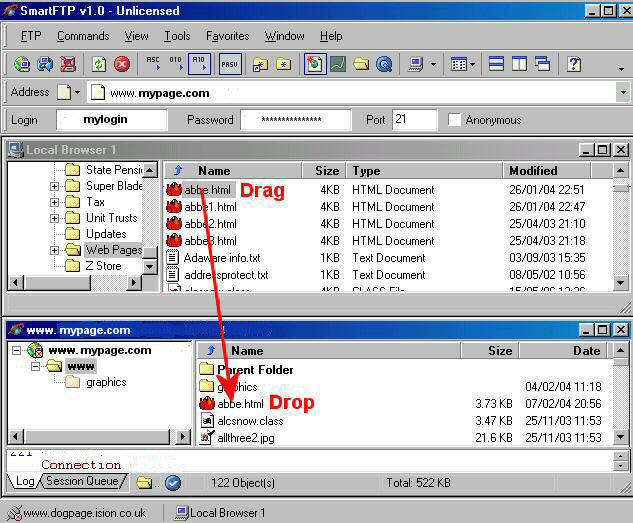
10) To Upload from a local Browser Using Drag and Drop
Open Local Browser by going to FTP on the Menu bar, then Local Browser in the dropdown menu as shown in the image below. (OR Ctrl + L)
Select Files and/or folders in the Local Browser
Drag your selected item and Drop it into the Remote Window as shown in the image below.
You can also use the Drag and Drop method from Windows Explorer too, just by opening Explorer and dragging and dropping files and folders from there.
Setting Permissions using the CHMOD command
I'm covering this briefly and as simply as possible. For certain scripts to work e.g. perl scripts you will need to set these. To do this :-(1) Open SmartFTP and connect
(2) Follow instructions above to locate your remote and local browsers.
(3) Upload the file you need permissions for to your CGI bin or other directory specified by your ISP, being sure the upload is in ascii mode if it is an unusual file type (.pl, .php, .cgi, .html, .txt, etc. are automatically set to ascii by SmartFTP).
(4)Once uploaded Right Click on it and you will get a menu like this:-

(5) Left Click on the CHMOD as shown, and you will get a box like this:-

(6) Setting Permissions
This is only necessary for perl or similiar scripts. Regular html, php, text files, and so forth, usually run at 644. If your file needs greater permissions to run (execute) or be writeable, then in the permissions box enter the appropriate value. 755 is what is required for most executable scripts. If it is a file that the script will read from and write too, then 666 is sufficient. You should never ever use 777 for a *file* permission, although you may set a directory to 777 in some cases. You will notice all the check marks will change, click OK and you're done! You will also notice in the log section of your SmartFTP window whether your command has been successful or not.
SmartFTP have excellent tutorials on their website at http://smartftp.com under the "Manuals" link, which cover installation, other methods of uploading and downloading and setting permissions under the CHMOD commands.
I chose the method I found the most convenient for me and hope you find this fairly "idiot proof" and clear.
Hazel
http://www.dogpage.ision.co.uk
http://www.freemax-associates.co.uk
http://www.novu.co.uk

In fairness to Hazel, Don and/or Franki have made a few modifications to her submission. You can tell where easily ... if it makes sense Hazel did it ... if not, it is our addition.